Showing posts with label Sewing. Show all posts

Thursday, October 25, 2012

You Know You're a Design Student When.....


Whenever I talk to someone who doesn't know anything about my school's Apparel Design program, they sometimes get the impression that us design students don't really do anything; that we spend our time slacking off and drawing pretty pictures while the engineering/science students do the real work (aka complex math problems and the like). 

Not true at all. Okay, a little true: I do sometimes draw pretty pictures. But seriously, us Apparel Design majors (and most other artistic majors) have a unique set of problems that most math-y students will never have: we have to produce stuff. Like, real garments, on machines. That's a whole lot different than working out problems with pencil and paper.

You know you're an Apparel Design student when: 
  • You run out of pins on your sewing table, so you check the ground.
  • Your pain tolerance towards pin/needle stabs is so high, you can make yourself bleed without even noticing.
  • You have almost burnt down your dorm room by leaving your iron plugged in for hours at a time.
  • Your floor is so littered with muslin yarns that no vacuum could possibly clean it all.
  • Your textbooks have more illustrations than real text.
  • You have a specific pair of scissors for any given material (fabric, paper, threads, plastic) and if someone tries to cut the wrong thing with the wrong scissors, you will give them a lecture on the importance of scissor sharpness.
  • You spend more hours in the sewing lab than you'd care to admit, and when it closes, you go back to your room and keep sewing.
  • You've been in danger of burns, stabs, or sewn-over fingers at least 10 times over the course of any given project.
  • You have to bring approximately a hundred different sewing tools to class, and you need about three square feet of space to spread it all out in. Or else you just. Can't. Work.
  • Your professors are utterly eccentric, and several have thick foreign accents.
  • While everyone else is studying in the library, you're still slaving away at the sewing machine; you have no idea what traditional studying's like.

Wednesday, October 17, 2012

Cynthia Rowley Ain't Got Nothin' on Me.


Our first major project in draping was to choose a designer garment, then recreate it. I chose this awesome asymmetrical dress from Cynthia Rowley's Spring/Summer 2013 line; isn't it cute? 

I think it's funny how often I'm talking about her on this blog; she's not my favorite designer by a long shot, but I love her pattern collaboration with Simplicity, and I love how easy and wearable her pieces are. That's what I normal go for in my designs as well, I suppose. 

Anyway, my flare didn't turn out in the exact same placement as the original (which I'll probably be counted off for). And this isn't the mannequin the dress is fitted to; my professional mannequin is smaller, which changes the fit. I'm still happy with this project, though. I'd really like to re-drape it in my size and sew it up in a fashion fabric, maybe with the flare cut from chiffon and the shift from cotton sateen. When will I have time to do this? Who knows!

But watch out, designers. I know how to replicate your works now. Draping is the absolute best. 

Monday, October 15, 2012

Homecoming '12


Here it is! The homecoming dress on a real, live person! My stylish little sis :)


Everything turned out fitting well. I added a slit to the underskirt at the last second, and I'm glad I did; I wanted the dress to be as comfy as possible.

How cute is this kid?!
Oh, look at how great she is at accessorizing.


I was also going to the dance (I know I'm a college student, but what can I say, these high school kids love me!). I wore a dress I made three years ago; I actually wore it to homecoming then, too! I'm so glad this dress still fits; it makes me feel like maybe I haven't gained tooo much college weight. Also, the fabric I used for it is so lovely; if I could go back in time, I would buy twenty more yards of this stuff for future projects.


Both of us in me-made dresses.

My date made the goofiest faces.


I definitely had the sweetest date ever; no close-ups of my corsage, but it was so pretty! And he was good at making goofy faces, which makes all the photos even better. 
Fun fact: I don't know the man in the background. Seriously... I'm kind of creeped out!
There you have it. Becky loved her dress, so this whole project was a success! Plus the dance was really fun (we had a party bus.....). So that's everything for now; onto the next project. Thanks for looking at this pic-heavy post :)

Wednesday, October 10, 2012

A Homecoming Dress.

As hard as I try, I just can't get away from high school dances. Last year I went to prom with my boyfriend (even though we were both in college... don't tell!), and this year I'm going to homecoming. Not only that, though, but I'm making a dress for my little sister to wear to the dance. She asked me if I'd make it for her about two weeks ago.

So let's just say it's been a crazy two weeks. I was really torn about wether or not to agree, since homecoming is next weekend. The rational part of me was saying "this is the last thing you need to add to your already-long list of responsibilities." But the side of me that really, really loves making formal dresses told me to go for it; plus, I could hardly disappoint my little sister.

Becky wanted a floor length dress, so I knew I needed to go with a simple pattern if I had any hope of getting it done on time. We chose Simplicity 2178, a Cynthia Rowley pattern, which I then made a ton of alterations to.


Unfortunately, this is the first Cynthia Rowley for Simplicity pattern I've used that hasn't worked out too well for me. I can almost never go wrong with Cynthia Rowley; I've sewn up 6 or 7 of her patterns and they've all turned out pretty great. Hey, I'm even wearing a sweatshirt I made from this pattern right now. But 2178 gave me a ton of problems; for some reason, several pieces just didn't fit together. The waistband was far too large for the bodice, even though I triple-checked that the correct sizes were cut out. And the facings also ended up being over an inch too large. I would normally attribute this to some mistake that I made during cutting, but just to double check, I pinned the actual pattern pieces together and they still didn't match. Hmmm. 

To solve the problem I just gathered the bodice into the waistband (which looks fine, it's just not what the instructions call for) and I tried my best to ease the top of the bodice into the facings. That's the part that doesn't look ideal, but I honestly didn't have a great alternative, especially with my time crunch.


The alterations I made to the pattern were to create my own braided straps, instead of using the pattern's way-too-thick ones; to draft my own skirt pieces (a shorter underskirt with a long chiffon overskirt, gathered a bunch); and to shorten the bodice a bit, making it slightly more empire-waisted. I also added decorative braided trim around the waistband, which took a ton of effort to create, but which really ties the dress together (at least in my eyes). 

Cutting the dress was my biggest challenge to overcome, since the main pieces are chiffon; but after that, construction was fairly simple. So far this semester I've been having to work on speeding up my sewing (if I wanna get my homework done on time, that is...), so knocking this dress out was a great exercise in fast-paced sewing. I sewed about 75% of this dress in one manic 6-hour stretch, fueled by copious amounts of iced coffee.


I'll post real pictures of my model in the dress after next weekend, but for now I'm really happy with how it's looking. I'm going to wear an old dress that I made to homecoming as well; maybe I can convince someone to do a sisters-in-handmade-formals photo shoot :) 

Thanks for reading this huge post! Have a great day, you guys :)


Sunday, July 1, 2012

Pajama Pants: DONE!


Sometimes, a garment that should be the easiest thing to make ends up being crazy difficult for no real reason. That was kinda my experience with these pajama pants. 

I think the main reason for the unexpected difficulty was because of all the alterations I ended up making to the pattern. I used Butterick 3698, a unisex pajama pattern, because it looked like exactly what I wanted (and I liked that it had a fly). Cutting the pants out was pretty annoying, since I kind of hate matching plaids, but over all I'd say that part turned out pretty well.

I think he likes them! Also, isn't he a good model?

That's when things got interesting. In the pattern, each pant leg is just one piece with an inseam; there are no outer side seams on these guys. However, as I had planned on adding pockets, this was a problem. So I just cut a side seam in anyway, and sewed in the in-seam pockets with a very small seam allowance. 

But then I sewed the inseam as well, and looked at the legs. They were huge. Like, I had even cut out a size smaller than he normally wears, and the legs were still so baggy they looked like clown pants. I know pjs need to be baggy, but really? This was insanity. So I went back and took and extra inch off each leg, which helped quite a bit. They're still quite loose, but at least they look like normal pajama pants now.


I also didn't like how the pattern gave the fly instructions. There was a lot of excess fabric, which I trimmed back. The pattern also didn't call for any sort of closure, but the fly was gaping so dramatically that he couldn't have worn them anywhere if I didn't add something. Two buttons did the trick nicely, though.


Finally, I did the waist band a little differently; after sewing the elastic in, I did three rows of topstitching over it for a more professional look. This is really easy to do, and will make any elastic waistband look a ton better; just stretch the waistband out till the elastic is taut and sew over it. After you're done, it will probably have stretched out a bit, but that's okay. Just hold an iron over the waistband and steam the heck out of it; you can actually watch the waistband shrink back to the right size! Cooooooool.


I'm really happy with how they turned out, but more importantly, so is Andy! I don't think I'd use this pattern again, because of the few odd little things I mentioned. However, I did enjoy how quickly these pants came together. Now I'm gonna make something else for myself; I'm currently starting on a clutch that's gonna be super lacy and girly. I hope you guys had an awesome weekend! :)

Tuesday, June 12, 2012

Floral Applique Top: FINISHED!


It's finally done! I've been working on this top for FOREVER; it feels so good to finally be able to move onto something new. And wear the finished product, of course :)


I got the main floral fabric at a flea market; I randomly found it stashed in a huge chest of drawers, and it only cost $2, so of course I had to have it. The two back panels are made from fabric from a thrifted nightgown (I hemmed about a foot and a half off of it, which left me with this extra fabric). All in all, I spent less than $5 to make this! I also love projects where I can repurpose old materials in some way. The last few garments I've made have used old fabrics; I'd like to keep that up.


I used Vogue 1170 by Rachel Comey for this top. I only made a few alterations to the pattern; I omitted the buttons and buttonholes on the back, and instead I just sewed the plackets together. I added a snap at the top so the top can be taken on and off easily, though. I liked the look of buttons, but with the applique going on on the back, I figured it would be best to leave them off so it didn't look too busy. The pattern also calls for gathering in the armholes, which I didn't do. I thought the gathering would make the armholes slightly too tight, and I'd always rather have something more loose and comfortable. 


The most challenging part was making this knot symmetrical (which honestly, I don't think I ever quite accomplished). It's hard to get precision with that kind of thing!


This top is finished with all French seams, which was a touch I really appreciated about the pattern. I'd never sewn with a Vogue pattern before, but I could definitely tell a difference in the quality of instructions- Vogue doesn't baby you. They expect you to know your sewing terms, and be comfortable with more challenging techniques. I liked it, and I liked that I didn't have to finish any edges with a serger. 


I'm finally ready to move on to a new sewing project! Up next: pajama pants for my boyfriend. I've had the fabric for quite a while; it's only fair. I'd also like to make myself a clutch; I've been wanting one for while, and it can't be difficult to do. Here's hoping I have time to sew between homework assignments.....


Wednesday, June 6, 2012

Wearing What I Sew: 6/6/12


So I just started summer classes, which means my days of nothing but work and relaxing are over; I actually have academic responsibilities again. Normally I'm that really dorky person who loves anything school-related; I guess the reason I'm not so excited about summer school is because neither of the classes I'm taking are particularly interesting to me. Chemistry and speech. I'm hoping it won't be so bad to balance my homework with all the sewing/DIY stuff I'd like to do... We'll see how it goes.

Meanwhile, here's what I wore to my first day of class. I made this top a long time (maybe 2 years) ago, and I haven't worn it for at least several months. Honestly, I'm kind of surprised it still fits! I made this from a vintage (1970's) pattern. It's chiffon underlined with cotton sateen; if I remember correctly, I actually bought really expensive fabric for this project. At the time, sewing with chiffon was quite ambitious for me.

It's definitely far from perfect; in fact, the top ruffle is not at all symmetrical on the back. One side hangs two or three inches lower than the other; it was definitely an error I made while cutting the slippery chiffon. Honestly, though, this top is so cute I'm willing to put up with it. I just have to figure that no one but me notices/cares. 

Saturday, June 2, 2012

Selling stuff you make: awkward, or is it just me?

This is kind of what the new Ravenclaw scarf I'm making will look like, except it won't have fringe all around the edges. 

One of my biggest goals is to own my own business one day, and earn a living from the things I sew (or knit or crochet, as a side project, I suppose). I'd love to be self-sufficient like that, and I hope to one day make that goal a reality. Which is why it's so ironic that I find charging people for the things I make to be so.... Well.... Awkward. 

It's not that I think my handmade stuff isn't good enough to sell: at the risk of sounding a little vain, I KNOW my sewing is ready-to-wear quality (and I'm striving for it to be better than that). I also know I'm capable of producing unique things that you couldn't necessarily find at the local mall. But I feel so presumptuous charging money for the things I make. 

A friend of mine just asked me to make her a Ravenclaw scarf (she's paying for it), and I agreed. I actually made a set of all four Harry Potter house scarves for someone a few years back, and got $80 for it. It's not often someone asks me to make them something and offers payment; a lot of people seem to think that I would like nothing more than to make them a complex dress/top/whatever, completely free of charge. I'm sure this happens to anyone who sews or knits, and it's pretty awkward. You'd think, because of that, that I'd be happy when someone offers to pay me for something.

So why do I still feel weird?

Does this happen to anyone else? I'm always afraid I'm charging to much... But, wait, what if I'm not charging enough? I see alot of stuff on Etsy that I think is far too expensive for what you're actually getting, and I worry about ripping people off. On the other hand, I am putting time and effort into making something, so I don't want to give away clothing for far less than it's worth. Should they pay for the materials? Should I? How do you reconcile this, and do you feel the same way that I do?

Friday, June 1, 2012

Vest: Made by me, Floral Top: American Eagle, Skirt: A gift, Shoes: Target

Maybe I didn't make my handmade clothes-wearing goal lofty enough! It's a new day and I'm wearing something else I made. I think this is a trend I could really get behind. Today it's my lace applique vest; this was one of my projects for basic apparel assembly last school year, and I spiced up the otherwise-simple pattern with lace detailing. My favorite thing about applique is that it's extremely easy to do, and the possibilities for it are almost endless. Plus, I used hardly any lace yardage, but I got a really great effect on this piece.


I don't wear this vest all too often because honestly, I'm not really a vest person. I guess even I can't say no to one covered in girly lace patterns, though. I know there's a ton of other stuff in my closet that would look great with this garment, so I'll definitely try to implement it into more outfits. 

Also, I'm going to the Bon Iver concert tomorrow, and I'm BEYOND excited. The last concert I went to was Taylor Swift (haha, lame, I know; I just love her!) but that was months ago. Anyone else a Bon Iver fan? Their music is gorgeous and mellow and perfect for falling asleep or rainy days. If you've never listened to them before, might I recommend Skinny Love?

Thursday, May 31, 2012


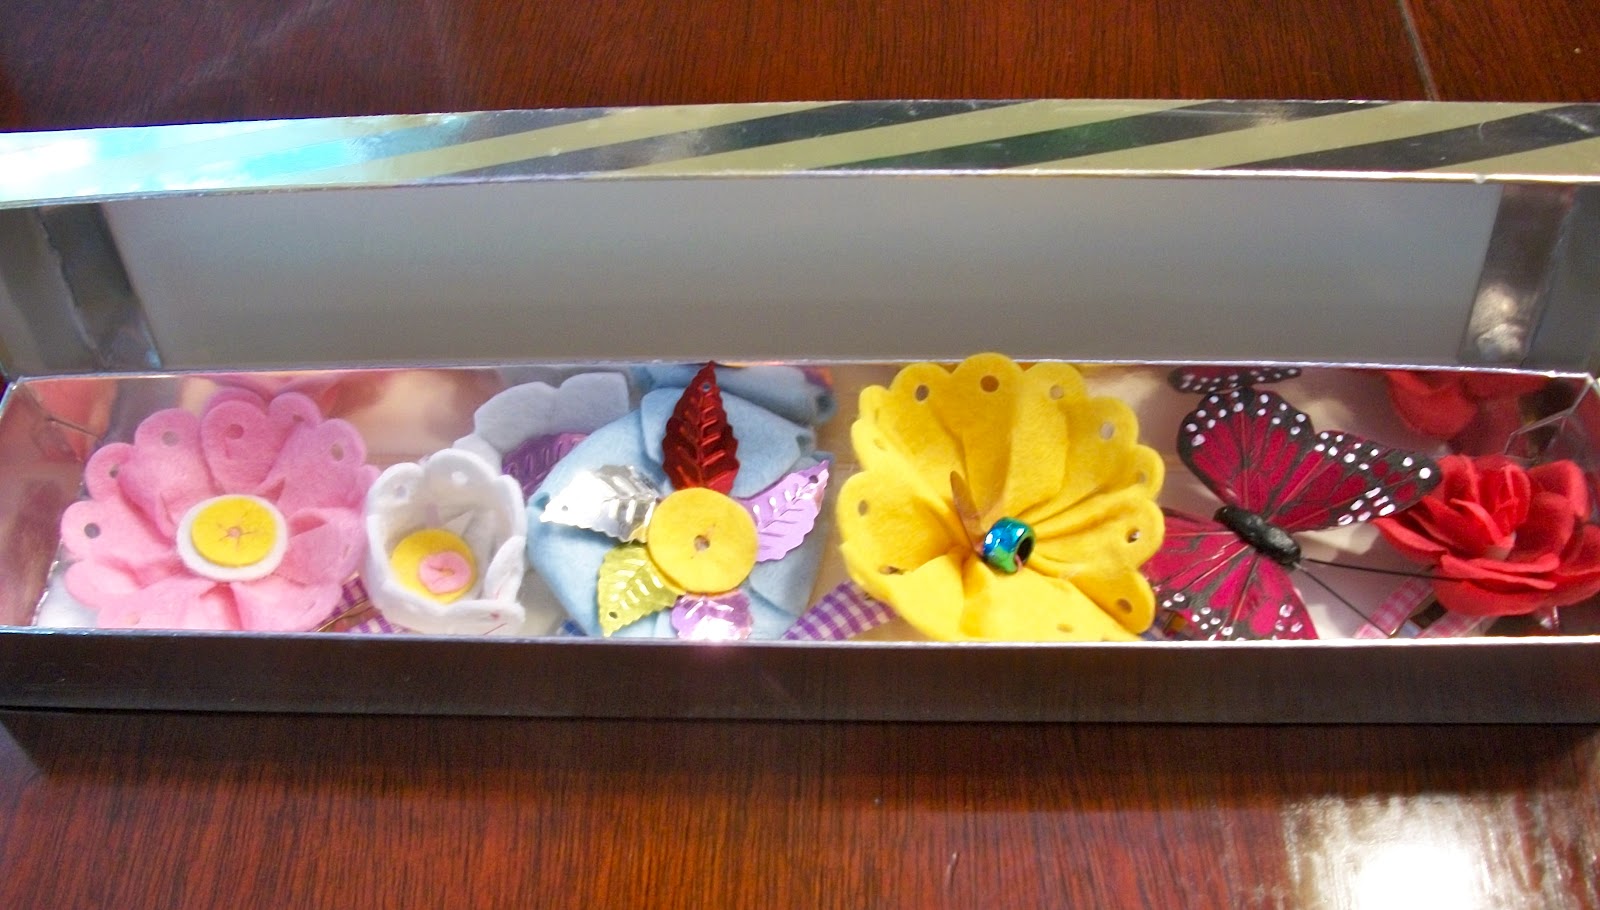
I definitely shouldn't be allowed into Target too often, because I always manage to find cool things that  I NEED and end up spending way too much money. This pastel flower kit is the newest example (I also picked up a giant crayon and a jar of licorice scottie dogs.... But those aren't blog worthy).

First of all, can we talk about the packaging? The adorable patterned cardboard box? I am a sucker for anything packaged beautifully. I wonder what I should do with the box once I use up my flower supplies.


It only gets better on the inside. The kit comes with needles, embroidery thread (I ended up using my own thread and needles, though, as I found they worked better), hundreds of felt pieces, little spangly things, beads, and pom poms. It also comes with a small instruction sheet, although I mostly just winged it (since everything was pretty much self-explanatory). If you have a Target anywhere near you, you must go buy one of these. They are in the craft aisle. It is necessary to your life, I promise.

After making a few flowers, and having a nerdily awesome time, I realized I didn't have a legitimate use for them. I wanted to make them into something for my next door neighbor's daughter, who's little and girly and adorable; I just didn't know what. Then I found some checked barrettes and knew it was meant to be. 


I sewed up four flowers and hot-glued them to the barrettes; then, since I had two extras, I hot-glued a fake flower and a butterfly to the remaining. Easy peasy, and six seemed like a good number to give. 


This is one of my favorites that I did; I don't really know why, since it didn't turn out quite as neat as some. I like how the leaf ended up, and the size of the flower (small in comparison to the others) is pleasing to me.


I really hope my little recipient enjoys them as much as I enjoyed making them; I really love small, cute projects like this. They're nice fill-ins while I'm working on something bigger (like my blanket!) that I need a break from.


And how perfect is this box?! It was such a stroke of luck that I found it; it was at the bottom of one of our drawers of wrapping paper. I love how this little project came together, all the way down to the packaging. I need more things to work out this way!

Tuesday, May 29, 2012


So I have this problem of never actually wearing the things I make. I get so excited about a project, and once it's finished I'll wear it once or twice, before it sinks into the depths of my closet and never sees the light of day again. I think a lot of this phenomenon can be attributed to the fact that I'm a perfectionist. I can almost always find flaws in the things that I make, and once I've noticed something that's not perfect, it's hard for me to get past it. Ironically, though, I shrug off these flaws in the store-bought garments that I wear all the time. It's definitely a double standard. 


Anyway, it's something I'd like to work on; actually wearing the things I've made, rather than relying on my store-bought clothes the majority of the time. I made this top last summer, out of a vintage scarf and a scrap of lace (both bought at an antique mall for a total of about $3). I didn't use a pattern; I'm finding more and more that this kind of spur-of-the-moment type of project really works for me. This top is extremely comfortable, flowy, and easy to wear, and it is probably gets the most use out of all my handmade stuff. 


I wore it for a six-hour work shift, where I got compliments from 2 coworkers, as well as a customer who asked if she could find the top in the store (I work at an American Eagle). Needless to say, I was pretty flattered someone thought it looked store-quality. After work this top graced coffee and a movie (The Avengers! Finally!) with the boyfriend. I was really comfortable all day, which is saying something, since sometimes the cutest clothes start to feel gross after a while. 

I need a goal of some kind: maybe to wear something I've made in two outfits per week. Hmm. That seems fairly manageable: it would also encourage me to sew up some new stuff, so I would have things to wear. Oh, and by the way, I've made one more scarf top just like this. It's so simple to do, maybe I'll have to whip a new one up this summer. 

My friend Ruth, the recipient of the 2nd scarf top. 


Monday, May 28, 2012


Reading's one of my favorite pastimes, and if I can find a book that relates to sewing in some way? Even better. The Creative Habit is the most recent book I've read and it was so inspiring, I immediately ordered my own copy from Amazon. If you are involved in any creative hobby-- or want to be and don't know how to get started-- this book is a must-have. 

If you're majoring in something artistic-- like I am-- people will often assume that you spend your time doing, well, not a whole lot. That you have it easier than engineering or mathematics majors, because your homework is normally sewing or drawing-related. I've encountered more than a few people who seem to think that Apparel Design is a joke of a subject to spend a college degree on. What I liked about this book is how accurately it shows that being creative, or artistic, takes effort, time, and a significant amount of skill. It's not for the lazy or unmotivated; if you want to produce something beautiful, you can't simply sit around waiting for inspiration to strike. It's just as valid of a career choice as something scientific, and you have to work just as hard for it.

"No one can give you your subject matter, your creative content; if they could, it would be their creation and not yours. But there's a process that generates creativity-- and you can learn it... There's a paradox in the notion that creativity should be a habit. We think of creativity as a way of keeping everything fresh and new, while habit implies routine and repetition. That paradox intrigues me because it occupies the place where creativity and skill rub together." 


This book is a great motivator. If you want to produce something of quality-- wether it's a garment, a piece of music, or even a business negotiation- you have to actively work, hone your skills, and do things that will help spark your creativity. Sometimes, great ideas really will hit you out of the blue; but you have to be willing to get them and to then do the work it takes to realize them. An artistic lifestyle takes motivation and perseverance.


"It takes skill to bring something you've imagined into the world: to use words to create believeable lives, to select the colors and textures of paint to represent a haystack in sunset, to combine ingredients to make a flavorful dish. No one is born with that skill. It is developed through exercise, through repetition, through a blend of learning and reflection that's both painstaking and rewarding... Even Mozart, with all his innate gifts, his passion for music, and his father's devoted tutelage, needed to get twenty-four youthful symphonies under his belt before he composed something enduring with number twenty-five. If art is the bridge between what you see in your mind and what the world sees, then skill is how you build that bridge." 


You can get your own copy here. (By the way, all quotes were taken from the intro chapter.)

Saturday, May 26, 2012


I wanted to sew 5 garments this month, since summer classes start in June. And.... that goal was totally not met. I envisioned camping out in my house all of May and being a complete sewing hobo, when in reality I've been working far more than I planned, and spending a lot of time with friends. But I'm not complaining: despite not making as many things as I wanted to, I've still done quite a bit.  I've finished 1 top and I'm almost done with another, I'm one color away from finishing the world's ugliest crocheted blanket, and now I have an altered pair of shorts.


They're vintage Levi's, and they're the definition of mom pants. I've had them for a long time; I probably got them at a Salvation Army, since that's my go-to thrift store, but I really don't remember. I'm not sure what prompted me to buy them, but I'm glad I re-discovered them a few days ago. Anyway, since these bad boys could only be improved, I thought I'd use up some of my huge (and ever-expanding) lace collection and add a back pocket detail. I got the idea from this Chictopia page. The only thing I did differently from their explanation was to turn the edges of the lace under for a cleaner finish, since lace tends to ravel. Honestly, though, this was such a simple alteration that it doesn't really need a how-to to figure out.


Regardless of how awkward my butt looks in them, these shorts will definitely be getting a lot more use now. I'm a sucker for anything girly. Also, if the lace looks familiar, it's because I used it on this project too:


Saturday, May 19, 2012

Things haven't been going the way I'd planned lately, but I'm starting to think that that's okay. Take this blanket I'm making, for starters. 

I took this beginner's crochet class last Saturday where we learned to make Granny Squares. I had a great time- I've never taken a class like that before, and it's something I definitely want to do again. Anyway, I bought this fancy yarn for the class, and I started making a Granny Square blanket out of it. I was loving how it looked, and the colors, and everything. But here's the thing; to finish it, I would have needed to buy about 10 more skeins of yarn. I'm a poor college student, and if I'm going to spend lots of money on anything, it will be fabric for sewing stuff. Then I realized how silly it was to be working on this fancy blanket when I have 7 or 8 skeins of yarn that have been sitting in my room for months. 

That's how this blanket was born. I'm making it from all the random colors of yarn I have. The uglier and crazier it gets, the better. It's not done yet- right now it's about the size of a baby blanket- but I'm excited to see how it grows and gets even better. I won't have to spend any money on it (okay... I may end up spending, like, $6 on it), which is perfect. I could use more projects like this-- easy, relaxing, and free. I'm having these dreams of putting my huge, crazy multicolored blanket in some future apartment. That would be pretty awesome.


Then there's this top. For some reason, this top doesn't want to be finished-- I feel like I've stalled all progress, and I'm not sure why. I really want to wear it! But I've had some pretty frustrating moments with it. Here's what I accidentally did; I cut a huge gash in one of the pink back panels. The fabric's so thin that while I was trimming a seam allowance, I didn't even notice it was happening. I didn't have enough fabric to cut a new piece, so I had to figure out a solution that would cover the gash and salvage the top.


So I created appliques down the back. The huge flower below is covering the gash (actually, to be exact, the leaf is covering most of it). I wasn't planning to embellish the back of the top like this. If I hadn't messed up like that, I probably would have already finished the top. But I'm happy with how it looks; I think it will be a lot more interesting than it would have otherwise been.


Despite all my planning, things like this happen. I change my plans abruptly and have to adapt to new circumstances. I'm really liking both of my projects, though.


Tuesday, May 8, 2012


One of my goals for the month of May is to sew 5 garments. This may seem like a lot, but since this is my only month of summer where I won't be in classes, it's pretty much now or never. Not to say that I won't sew once summer school starts: but between two classes and a job, I'll have to prioritize. My lofty sewing goal is where this shirt came in.


I have another project (it's a Vogue pattern) already halfway constructed. But what I really wanted to do was make the top you see here: the idea for it hit me randomly and I realized it was worth pushing other projects aside for. I think, after the end of a stressful school year filled with lots of sewing for grades, this was just the kind of thing I needed to work on. It was simple: I didn't use a pattern, just cut out various rectangles which I didn't really measure. I didn't try too hard, and I didn't stress if small details didn't pan out quite right. 


It definitely has flaws, but I'm still thrilled with it. It's made from a scrap of metallic cotton knit I have had for a few years, and have never had a use for; the small amount I had was perfect for this, and I used all of it up. The lace  yoke is from some yardage my mom found at a garage sale, also a few years ago. And then there's some lace trim that my great grandma gave me (I have several bags full of vintage lace trim, and so few projects that actually look good with that type of thing). Since I already had all the materials, this top was free to make- the best kind of project! 


Construction note: All French seams, so the inside is very neat. Finished with a rolled hem on the bottom (which was hell with the slinky knit, and honestly didn't turn out too well). The neckline and sleeves are finished with lace bias binding; I'm happy with how that part turned out. I added side panels, almost as an after-thought, because the top didn't have enough ease. I'm really glad I did-- it would have been far too tight otherwise.


One garment down, and it was a simple, satisfying one. Now that I've gotten this bit of compulsiveness out of my system, I think I'll finish the other project that I had started.